


Mar 30, 2026
[New Standards] Motorcycle Engine Displacement Categories: Maintenance Costs, Traffic Rules, and Licenses for Each Displacement
Can you replace a motorcycle's headlight yourself? A guide to the replacement process and estimated costs.
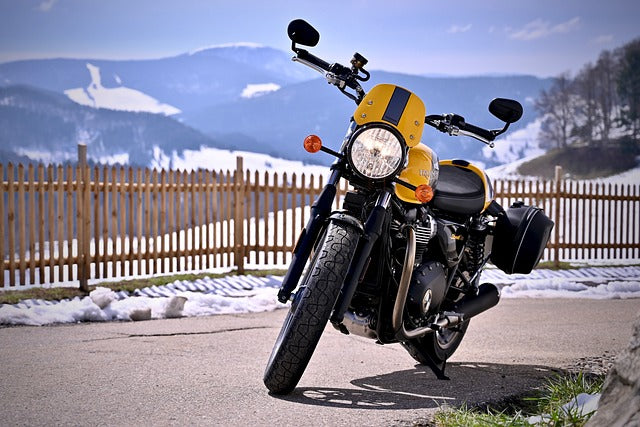
Types of Motorcycle Headlights

Source: https://pixabay.com/ja/photos/A4-407175/
Motorcycle headlights are often considered the "face" of the bike. Besides LEDs, which are becoming the mainstream today, there are also HID and halogen headlights, the latter of which are commonly found in older models.
This section explains what each type of headlight is, so if you are considering replacing your headlights or are interested in lighting, please refer to it.
Halogen
Halogen headlights are the most common type, adopted by most motorcycles sold since around 1970, including older models.
These are classic lamps that emit light using a filament inside the bulb. They are inexpensive and easy to obtain, but they generate a lot of heat and consume a lot of power, making them prone to overheating. Their lifespan is typically around 500 to 1,000 hours.
Halogen headlights consume 55W/60W and emit about 1,000 lm (lumens) of light, with a relatively narrow illumination range.
HID
HID stands for High-Intensity Discharge. These lights generate intense light by creating an arc discharge with tens of thousands of volts from a component called an igniter.
Immediately after illumination, the light has a slightly bluish tint, but gradually changes to white, a characteristic emission of HID. Their lifespan is approximately 2,000 hours, about twice that of halogen.
HID headlights consume 35W, which is lower than halogen. They also produce about 3,000 lm, roughly three times the light output of halogen, and have a wider illumination range. However, they create a clear boundary between illuminated and unilluminated areas, making them prone to casting shadows.
LED
LED stands for Light Emitting Diode, referring to a semiconductor called a light-emitting diode.
Power consumption is 25-30W, about half of halogen. The brightness of mainstream models is around 4,000 lm, about four times that of halogen, and the illumination range is wide, depending on the number of built-in LEDs.
A key feature of LEDs is their fast startup, reaching maximum light output the moment they are turned on, without the slight delay experienced by HID in reaching full brightness.
Can You Replace Motorcycle Headlights Yourself?

Source: https://pixabay.com/ja/photos/AA-3164399/
For motorcycles with exposed headlights, such as naked bikes, it is possible for an amateur to replace the headlights if they have some basic mechanical skills.
The tasks required for headlight replacement typically involve removing the screws that secure the headlight, disconnecting and reconnecting wiring, and physically swapping out the headlight. However, there are some important points to be aware of.
Precautions During Replacement
If the headlight's optical axis is outside the specified range or the light intensity changes due to replacement, the motorcycle may fail its vehicle inspection.
For naked bikes with exposed headlights, there are screws for adjusting the optical axis on the headlight rim, so optical axis adjustment is necessary after replacing the headlight.
Also, when using halogen bulbs, fingerprints on the bulb can cause it to heat up and burn out more easily, so avoid touching the bulb with bare hands.
Naked bikes can also have turn signals replaced simultaneously.
Naked bike headlights often contain wiring for turn signals, so if you're planning to convert your turn signals to LED, it's recommended to replace them at the same time as the headlights.
However, when switching from halogen turn signals to LED, if you simply replace them, they will hyperflash (blink rapidly). To prevent this, you should either replace the relay with a hyperflash-compatible one or choose turn signals with built-in resistors.
Motorcycle Headlight Replacement Procedure

Source: https://pixabay.com/ja/photos/80-4650380/
Here, we'll explain the headlight replacement procedure. As a precaution, always check that the optical axis is not misaligned after replacement, and adjust it if necessary.
If the optical axis is misaligned, not only will the motorcycle fail its vehicle inspection, but the illuminated area during night riding will be off, making it dangerous due to obstructed vision.
Tools Required for Replacement
For naked bikes with exposed headlights, the tools required for replacement are a Phillips screwdriver, two spanners or box-end wrenches (for removing the headlight mount), and electrical tape.
For bikes with fairings, you will need a Phillips screwdriver to remove the fairing, and depending on the model, an 8-10mm spanner or box-end wrench may be required to remove the headlight from the fairing.
Work Procedure
Motorcycle headlight replacement follows these steps (for naked bikes):
- Removing the headlight rim (cover)
- Disconnecting the connectors around the headlight
- Installing the new headlight
- Securing the headlight unit
- Checking headlight operation
Let's look at them in order.
Step 1: Removing the Headlight Rim (Cover)
First, remove the headlight unit. In most cases, it is secured by about two screws on the rim. After removing the screws, the unit can be easily removed by pulling it downwards and towards you.
The headlight unit and the wiring extending from the back are connected by a connector. Disconnect this connector, being careful not to apply excessive force to the wiring, as this can lead to断線 (disconnection). Gently remove it, ensuring no strong force is applied to the wiring.
Step 2: Disconnecting the Connectors Around the Headlight
Once the headlight unit and wiring are disconnected, remove the headlight mount remaining on the vehicle body.
There are various wires inside the headlight, such as for the turn signals. If the headlight mount is difficult to remove, temporarily disconnect the wires.
The wiring is connected with connectors (couplers), so they can be easily removed by pulling them out. To avoid confusion about which wire connects where, it's a good idea to put tape on the connectors and write identification numbers on them.
Step 3: Install the New Headlight
Install the new headlight mount in the reverse order of removal, and then connect the electrical wiring around the headlight. Be sure to check that all wires are connected as you proceed with the work.
Once the wiring is connected, it is recommended to wrap electrical tape around the connection points for waterproofing.
Step 4: Secure the Headlight Unit
Once the headlight mount and surrounding electrical wiring are connected, connect the headlight unit wiring and secure it to the mount.
When securing the headlight unit, make sure no wires are pinched and that no excessive force is applied to them.
If the wiring is under undue stress, it can disconnect due to vibrations during riding, so caution is necessary.
Step 5: Check Headlight Operation
Once the headlight is secured, check that the headlight, turn signals, and other components are operating correctly.
Also, replacing the headlight requires adjusting the optical axis, which needs a wall or flat surface to project the headlight beam onto.
There are detailed standards for the illumination range and the difference between high and low beams. If the optical axis is significantly off, night driving can be dangerous, so it's advisable to have a professional shop adjust the optical axis for you (cost: around 2,000 yen).
Estimated Cost of Motorcycle Headlight Replacement

Source: https://pixabay.com/ja/photos/B8-2619494/
This section explains the approximate cost of having a motorcycle headlight replaced at a bike shop.
We will also discuss the cost if you replace it yourself, so please refer to both for comparison.
When Taking it to a Motorcycle Shop
If you have your headlight replaced at a motorcycle shop, the average cost for naked bikes with exposed headlights starts from 6,000 yen. If you bring your own headlight, the average cost starts from 9,000 yen.
For sport bikes or tourers with fairings, the cost for headlight replacement is 7,000 yen, and if you bring your own headlight, the average cost starts from 10,000 yen.
When Replacing it Yourself
If you replace the headlight yourself, there are no labor costs, but you will need to prepare the necessary tools in addition to the headlight itself.
Phillips screwdrivers, spanners, and box-end wrenches can be purchased at 100-yen stores, but considering tool precision and durability, it's better to get them at a hardware store.
Even if you buy a Phillips screwdriver and two spanners at a hardware store, they can be acquired for under 1,000 yen. Stands start from about 5,000 yen, so all tools can be bought for about 6,000 yen.
Motorcycle Headlight Replacement FAQ

Source: https://pixabay.com/ja/photos/A1-4112554/
Regarding motorcycle headlight replacement, we have compiled "frequently asked questions" and their "answers" about common doubts and things you might want to know.
If you are considering or interested in replacing your headlights, please refer to this section.
What is the lifespan of a motorcycle headlight?
The lifespan of motorcycle headlights varies by lamp type. Common halogen bulbs last 500 to 1,000 hours, while HID bulbs are rated for approximately 2,000 to 3,000 hours.
LEDs, which are becoming mainstream, have an overwhelmingly longer lifespan of about 20,000 hours compared to halogen and HID. Even if illuminated for 5 hours daily, it would take 4,000 days to reach that lifespan.
Halogen bulbs are vulnerable to vibration and may burn out before their expected lifespan if ridden on rough roads. HID bulbs gradually lose brightness, and their lifespan is considered to be over when they reach about 70% of their original light output.
How much does it cost to convert a motorcycle headlight to LED?
When converting a motorcycle headlight from halogen to LED, some motorcycles can simply have the bulb replaced, while others may face difficulties due to electrical or installation space issues.
LED bulbs themselves are available starting from around 6,000 yen, and some types can be installed by simply replacing the halogen bulb. However, these are often limited to scooters or small-displacement vehicles, so there aren't many compatible models.
Some shops sell LED conversion kits or offer custom LED installations. Depending on the model, converting the headlight to LED can cost around 10,000 to 20,000 yen. If you include turn signals and taillights, the cost can range from 60,000 yen upwards.
What is the recommended headlight for replacement?
The recommended headlight for replacing a halogen one is LED, due to its long lifespan, low power consumption, and fast startup. However, installation can be difficult depending on the motorcycle.
Generally, LED lamps are larger than halogen lamps. Some LEDs have cooling fins or are separate units, and cannot be installed if there isn't enough storage space.
While LEDs are superior to halogen in terms of brightness, power consumption, and lifespan, there are many installation constraints. If you are considering a replacement, it's a good idea to consult a shop.
Summary

Source: https://pixabay.com/ja/photos/A1-795948/
We have explained motorcycle headlight replacement, including headlight types, characteristics, and replacement procedures.
For halogen headlights, converting to LED is recommended due to its long lifespan, low power consumption, and significantly higher light output. However, there are installation constraints, and simply replacing the bulb may not result in proper illumination.
LED bulbs are longer than halogen bulbs, and their cooling fins can sometimes prevent them from fitting inside the headlight housing. If you are considering an LED conversion, it's a good idea to consult a professional.
Recommended Products
Latest Articles


Popular product


×
![]()